Run Kali Linux directly from your USB flash drive! Install Kali Linux on a USB flash drive and use this Kali USB as a portable solution instead of installing kali on your hard drive. Simply plug the Kali USB drive in and boot into a full-featured Kali Linux whenever you need it. Additionally, I used a Samsung 970 EVO Plus 250GB NVMe M.2 SSD with the Asus ROG Strix Arion M.2 NVMe SSD Enclosure as a USB drive to install Kali Linux.
Installing Kali Linux on a USB Flash Drive: A Step-by-Step Guide to Creating a Portable and Standalone Kali Bootable USB
This step-by-step guide will demonstrate how to install Kali Linux on a USB flash drive, allowing you to run kali Linux directly from the USB flash drive and transform the flash drive into a portable USB cybersecurity tool you can use anywhere, anytime. Moreover, Experience the standalone, full-fledged Kali Linux and its complete functionalities directly from the USB flash drive, without the need to install it on your computer’s hard drive.
Step 1: Preparing to Install Kali Linux on a USB Flash Drive
- First download required Kali Linux ISO images from https://www.kali.org/
- Create a bootable “Kali Linux Live USB” flash drive using Rufus.
- Create a bootable “Kali Linux installer” on a flash drive using Rufus.
- Copy the “boot” and the “EFI” folders from the Kali Linux Live ISO file and keep it in a flash drive.
- Unplug the SSD and hard drive from the laptop.
- Insert and boot the Kali Live USB: Select live system(amd64) and boot kali live.
- Insert the target USB flash drive.
Identify which storage device (HDD/SSD) is your target USB drive for kali installation by using command: sudo lsblk or sudo fdisk -l
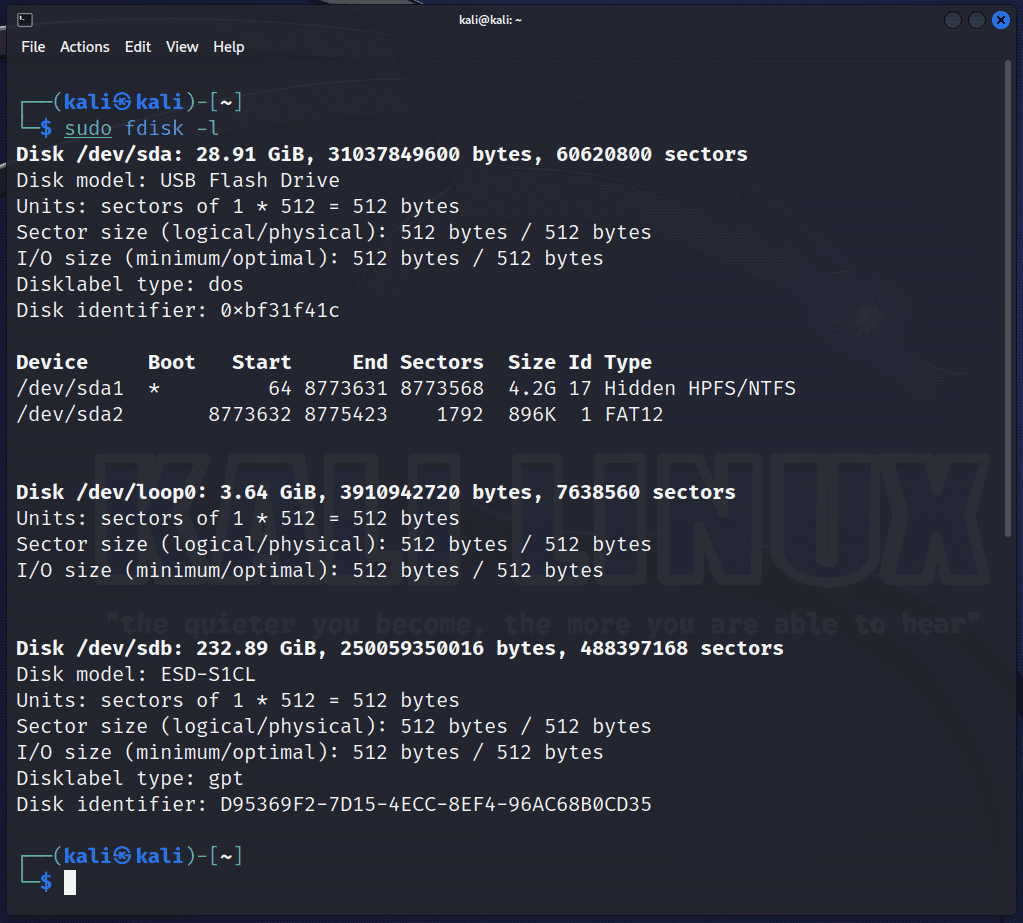
Here, The USB drive located at /sdb is my designated target for installing Portable Kali Linux.
Step 2: Partitioning the Target USB Drive for Kali Linux Installation
Start GParted. Type command sudo gparted. Delete all existing partition of the target flash drive using GParted.
Now we will create 4 partitions on the target USB using gdisk. These four partitions will be configured as follows:
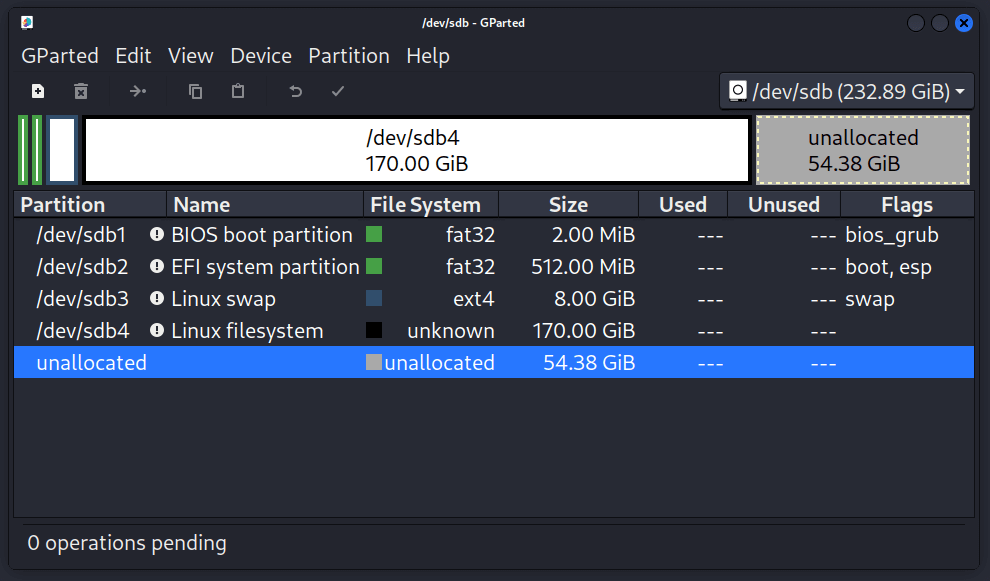
/dev/sdb1, 2.0 MiB, type ef02, BIOS boot partition.
/dev/sdb2, 512.0 MiB, type ef00, EFI System Partition (ESP).
/dev/sdb3, 8.0 GiB, type 8200, Linux swap.
/dev/sdb4, 170.0 GiB, type 8300, Linux filesystem, main partition (/ Root)
Note: If your system is UEFI-based, then GRUB2 would typically be installed in the EFI System Partition (ESP) (/dev/sdb2). If your system is BIOS-based, Grub2 will be installed in the BIOS boot partition (/dev/sdb1).
Type Command: sudo gdisk /dev/sdb to open gdisk for partitioning
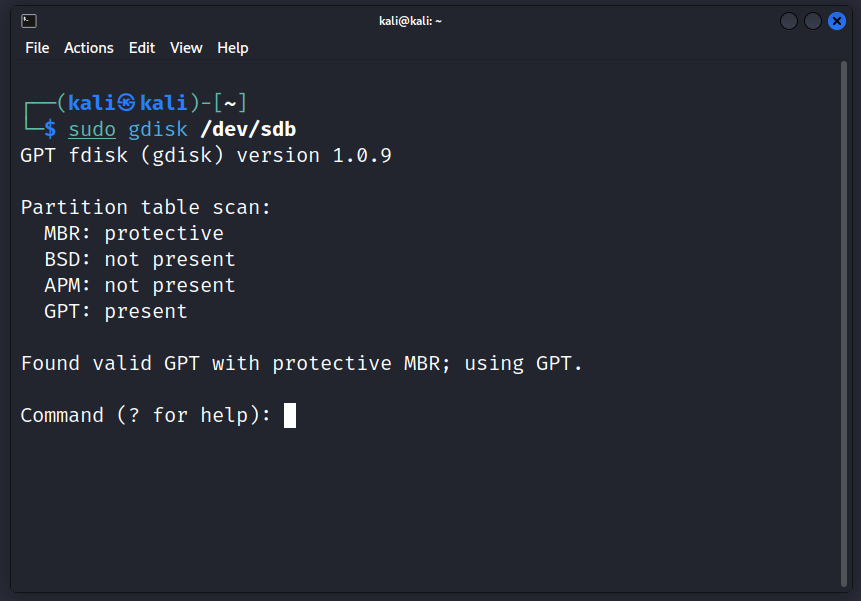
If you press ? then it will show you all the command available for gdisk.
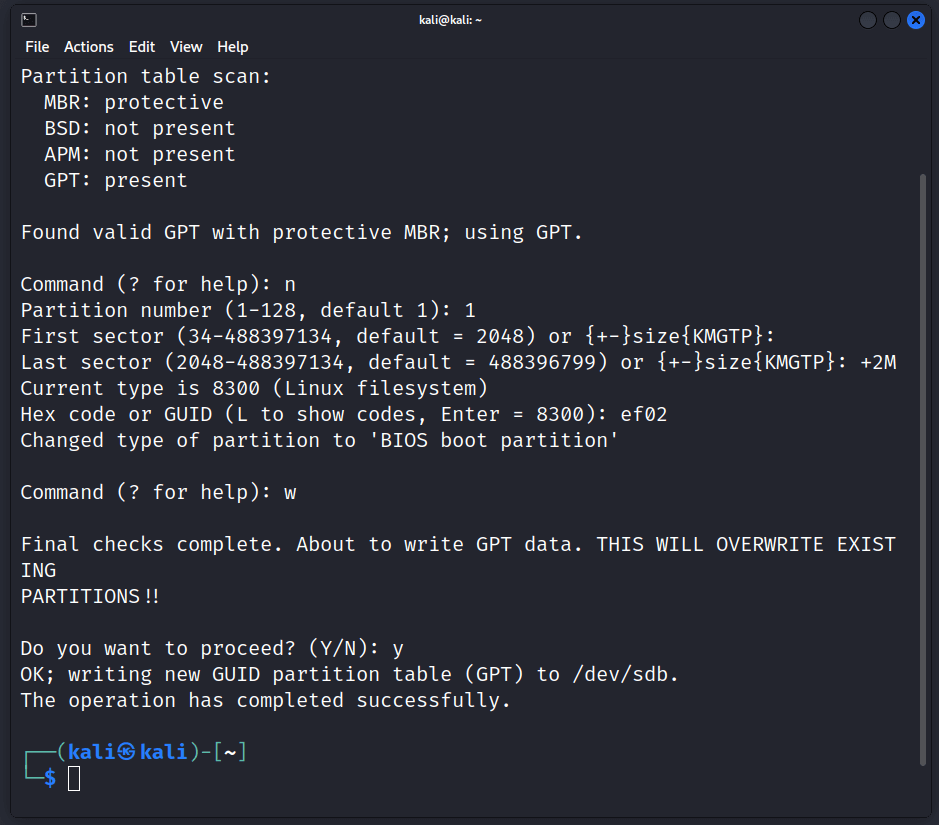
Create the 1st Partition:
Type n to create a new partition.
Partition number: type number 1, First sector: press enter to use default, Last sector: type +2M, Hex code or GUID: type ef02 press enter. Press w and save the changes. Press y.
Now, type again sudo gdisk /dev/sdb to create 2nd partition.
Create the 2nd Partition:
For the 2nd partition, use the following settings:
Partition number: type number 2, First sector: press enter to use default, Last sector: type +512M, Hex code or GUID: type ef00 press enter.
Press w and save the changes. Press y.
Create the 3rd Partition:
Partition number: type number 3, First sector: press enter to use default, Last sector: type +8G, Hex code or GUID: type 8200 press enter.
Create the 4th Partition:
Partition number: type number 4, First sector: press enter to use default, Last sector: type +170G, Hex code or GUID: type 8300 press enter.
View Partition Information: sudo gdisk -l /dev/sdb [/dev/sdb is the target flash drive]
Once all the partitions are created, if you open GParted to inspect the partitions, you will see the following configuration:
Once the partition has been created, shut down the Kali Linux live system.
Step 3: Begin Kali Linux Installation on USB Flash Drive
Now boot the “Kali Linux installer” bootable USB and start Graphical installation.
Start Graphical Installation:
Once the Kali Linux boot menu appears, choose the “Graphical Install” option. This will start the installation process in a user-friendly graphical mode, making it easier to navigate through the installation steps. Follow the on-screen instructions to select your preferred language, location, and keyboard layout.
Network Configuration:
When prompted for network configuration, choose the option to manually enter your network’s ESSID (Extended Service Set Identifier) if you are connecting to a WiFi network. This is the name of your wireless network.
Select “WPA/WPA2 PSK” as the security method. You will be prompted to enter the passphrase for your WiFi network. Ensure you input this accurately to enable a successful network connection.
Step 4: Configure Partitions
During the installation process, configure the partitions as follows:
Partition disks: Select Manual
Select 2 MB partition (biosgrub)
Verify that “Use as: Reserved BIOS boot area” is selected and the “Bootable flag” is set to off. If these settings are already in place, refrain from making any further adjustments. However, if Kali Linux displays an error, you may manually select these settings.
Select 512 MB partition (EFI File System)
Use as: EFI System Partition
Bootable flag: on
Select 8 GB Partition (Linux Swap)
Use as: swap area
Select these settings manually.
Select 170 GB Partition (Linux file system)
Use as: Ext4 journaling file system
Mount Point: / (Root)
Select these settings manually.
Now, Finish partitioning and write changes to disk. Then Start Installing Kali Linux. Once the installation is complete, Kali will initiate its boot process. Shut down the Kali system.
Step 5: Boot Kali Linux Live USB and Enable Root User
Now, Insert the “Kali Linux Live USB” we created in the beginning and boot into the live version of Kali Linux.
In terminal type command: sudo passwd
Enter your desired password, then switch current user and login with the root user with the provided password.
Step 6: Copy “boot” and “EFI” Folders to the sdb2 (EFI system partition)
Now you need to paste the copied “boot” and “EFI” folders (from Step-1) onto the sdb2 partition (EFI system partition). If the “boot” and “esp” folders already exist, replace them during the copying process.
You can create folders within the /mnt directory, such as /mnt/folder1 for mounting one drive and /mnt/folder2 for mounting another. Make sure you create the folders first in /mnt directory before mounting. To unmount, you can use the command sudo umount /mnt/folder1, following a similar structure.
Mount the EFI System Partition (/dev/sdb2):
Command: mount /dev/sdb2 /mnt
Navigate to the /mnt directory, then paste and replace the “boot” and “EFI” folders copied from the Kali Live ISO.
Unmount the sdb2 (EFI System Partition):
To unmount type command: umount /mnt
Step 7: Copy GRUB Configuration
Next, you need to copy the grub.cfg file from the /boot/grub/ directory of your main Kali Linux partition (/dev/sdb4) to the EFI System Partition (/dev/sdb2). To do that first mount sdb4 in /mnt directory.
Mount the Kali Linux partition (/dev/sdb4):
Command: mount /dev/sdb4 /mnt
Navigate to /mnt directory where sdb4 is mounted, then go to /boot/grub/ and copy grub.cfg and save it on your desktop or an extra flash drive.
Now unmount the sdb4 with command: umount /mnt
Now,mount the sdb2 and copy the grub.cfg from the desktop or extra flash drive to /boot/grub/ directory of sdb2.
Mount the sdb2 EFI System Partition:
Command: mount /dev/sdb2 /mnt
Copy the grub.cfg file from your desktop or extra flash drive to the /mnt/boot/grub/ directory.
After that, turn off the Kali Live system.
Step 8: Re-Install GRUB
- Boot the Kali system installed on the flash drive and log in to your user account.
- Enable Root user (with command: sudu passwd) and login with Root user.
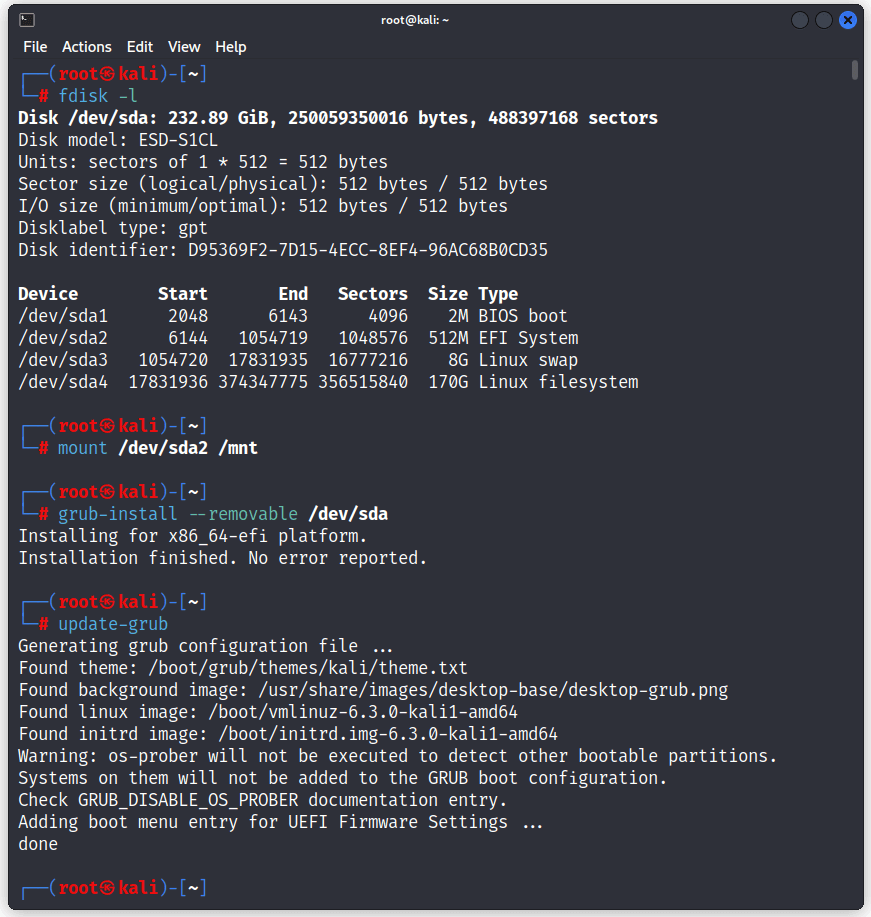
- After logging in as the root user, view all partitions by executing the command: fdisk -l
- Mount sda2 (EFI system partition) Command: mount /dev/sda2 /mnt
To Re-Install GRUB In Kali type command:
grub-install --removable /dev/sda
update-grub
Step 9: Update Kali Linux
Run the following command in kali linux terminal:
sudo apt update
sudo apt full-upgrade -y
After completing the updates, shut down your computer and reattach the previously unplugged SSD or HDD. From now on, whenever you need to use Kali Linux, simply plug in your prepared “Kali Linux USB Flash Drive” and boot from it. The Kali USB is self-contained and portable; updating it won’t affect your other operating systems and their bootloader. I even tested this Kali USB flash drive on another computer and was able to boot it and use it. In addition, if you encounter any issues with the NVIDIA driver in Kali Linux, such as improper installation, you may refer to this guide on how to install the NVIDIA driver on Kali Linux.


Subscribe To Our Newsletter
Join our mailing list to receive the latest news and updates from our team.
You have Successfully Subscribed!