Installing NVIDIA drivers on Kali Linux can be challenging and tricky. However, this comprehensive guide will show you the process of successfully installing NVIDIA drivers for Kali Linux users. I followed these steps to install my NVIDIA GTX1050Ti drivers on Kali Linux. Note that, in this tutorial, the Nvidia driver was installed on Kali Linux with the GNOME Display Manager (GDM).
Installing Nvidia Driver on Kali Linux
This step-by-step guide aims to help you successfully install NVIDIA drivers on Kali Linux. If you have already installed Kali Linux with the GNOME Display Manager (GDM) and can boot and log into it, you don’t need to follow Step 2. Just ensure that you have enabled root access for Kali Linux and proceed directly to Step 3.
Step 1: Installing Kali Linux
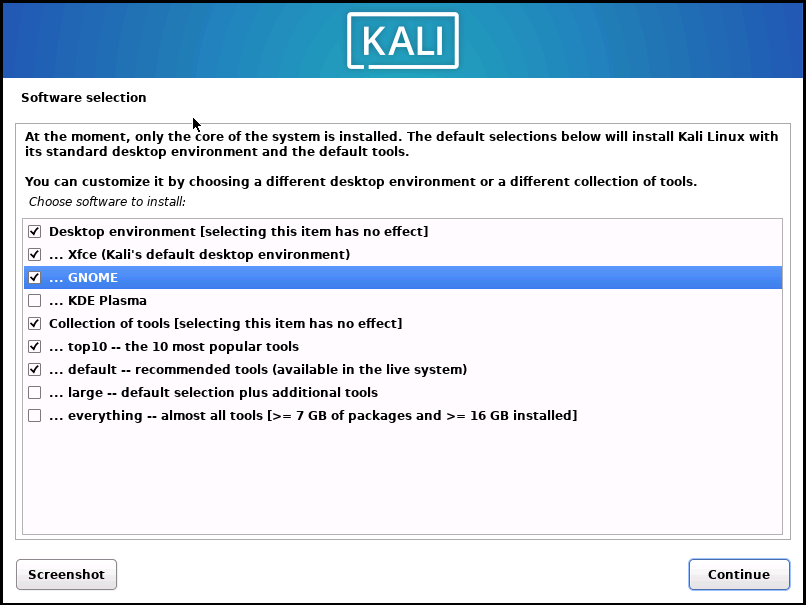
To install NVIDIA drivers on Kali Linux, ensure that GNOME is selected as your desktop environment during the ‘Software Selection’ stage of the installation process. However, if you want to install Kali Linux on a USB flash drive and make it portable, please follow the “Portable Kali on USB” guide.
After Kali installation, you can verify the default display manager by executing the following command in the terminal:
sudo cat /etc/X11/default-display-manager
If the output is /usr/sbin/gdm3, GDM3 is correctly set up as your display manager.
Updating Kali Linux:
apt-get update
apt-get upgrade
apt-get dist-upgrade
Enabling Root Access:
After logging in to Kali Linux system, you need to have root access to install the Nvidia driver. To do that type “sudo su” (without quotation mark) in the terminal and enter the password of your kali user account. Now type “passwd root” in the terminal, then enter the new password for the root user and retype that password again.
Now type sudo nano /etc/pam.d/gdm-password and you will see something like this:
#%PAM-1.0
auth    requisite       pam_nologin.so
auth    required        pam_succeed_if.so user != root quiet_success
@include common-auth
auth    optional        pam_gnome_keyring.so
@include common-account
# SELinux needs to be the first session rule. This ensures that any
# lingering context has been cleared. Without this it is possible
# that a module could execute code in the wrong domain.
session [success=ok ignore=ignore module_unknown=ignore default=bad]        pam_selinux.so close
session required        pam_loginuid.so
# SELinux needs to intervene at login time to ensure that the process
# starts in the proper default security context. Only sessions which are
# intended to run in the user's context should be run after this.
# pam_selinux.so changes the SELinux context of the used TTY and configures
# SELinux in order to transition to the user context with the next execve()
# call.
session [success=ok ignore=ignore module_unknown=ignore default=bad]        pam_selinux.so open
session optional        pam_keyinit.so force revoke
session required        pam_limits.so
session required        pam_env.so readenv=1
session required        pam_env.so readenv=1 envfile=/etc/default/locale
@include common-session
session optional        pam_gnome_keyring.so auto_start
@include common-password
Add # in the beginning of 3rd line, like this #auth required pam_succeed_if.so user != root quiet_success and keep rest of the things unchanged. Then press Ctrl + O to save the changes. Restart computer and log in with root user.
Step 2: Resolving Boot Issues (if applicable)
This step is crucial if you encounter issues booting into Kali Linux due to system halts or freezes. If your Kali Linux OS boots and logs in without any problems, this step can be skipped.
Edit the GRUB Bootloader: If Kali Linux fails to boot, modify the boot parameters using the GRUB loader. Replace “quiet splash” with “nouveau.modeset=0” to prevent the Nouveau drivers from loading.
After turning on the computer, when the Kali Linux GRUB loader screen appears, select Kali Linux from the GRUB menu and press ‘E’. Replace “quiet splash” with “nouveau.modeset=0” to disable the Nouveau drivers from loading. Finally, press ‘F10’ to boot. Implementing these steps will resolve boot loading and freezing issues in Kali Linux, allowing Kali to boot normally.
Instructions with images are shown below:
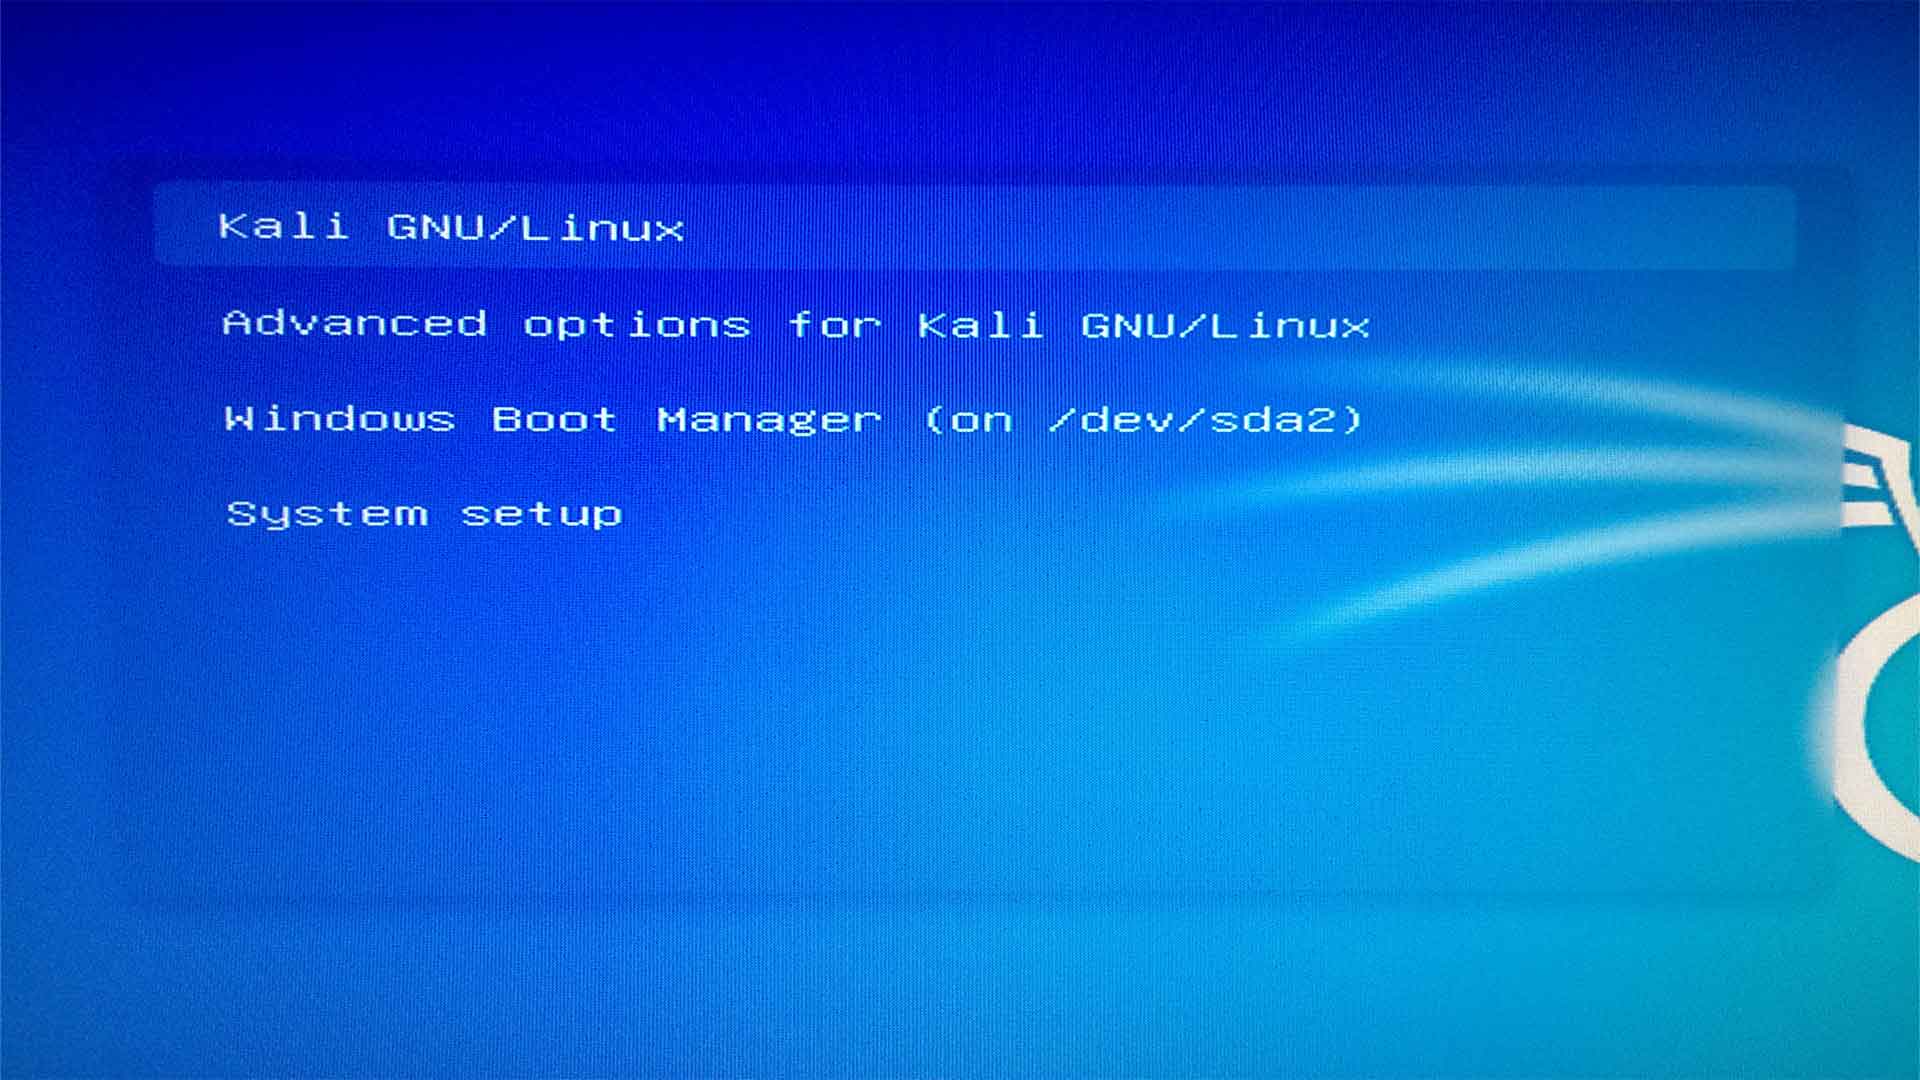
From the GRUB loader select Kali Linux and press E.
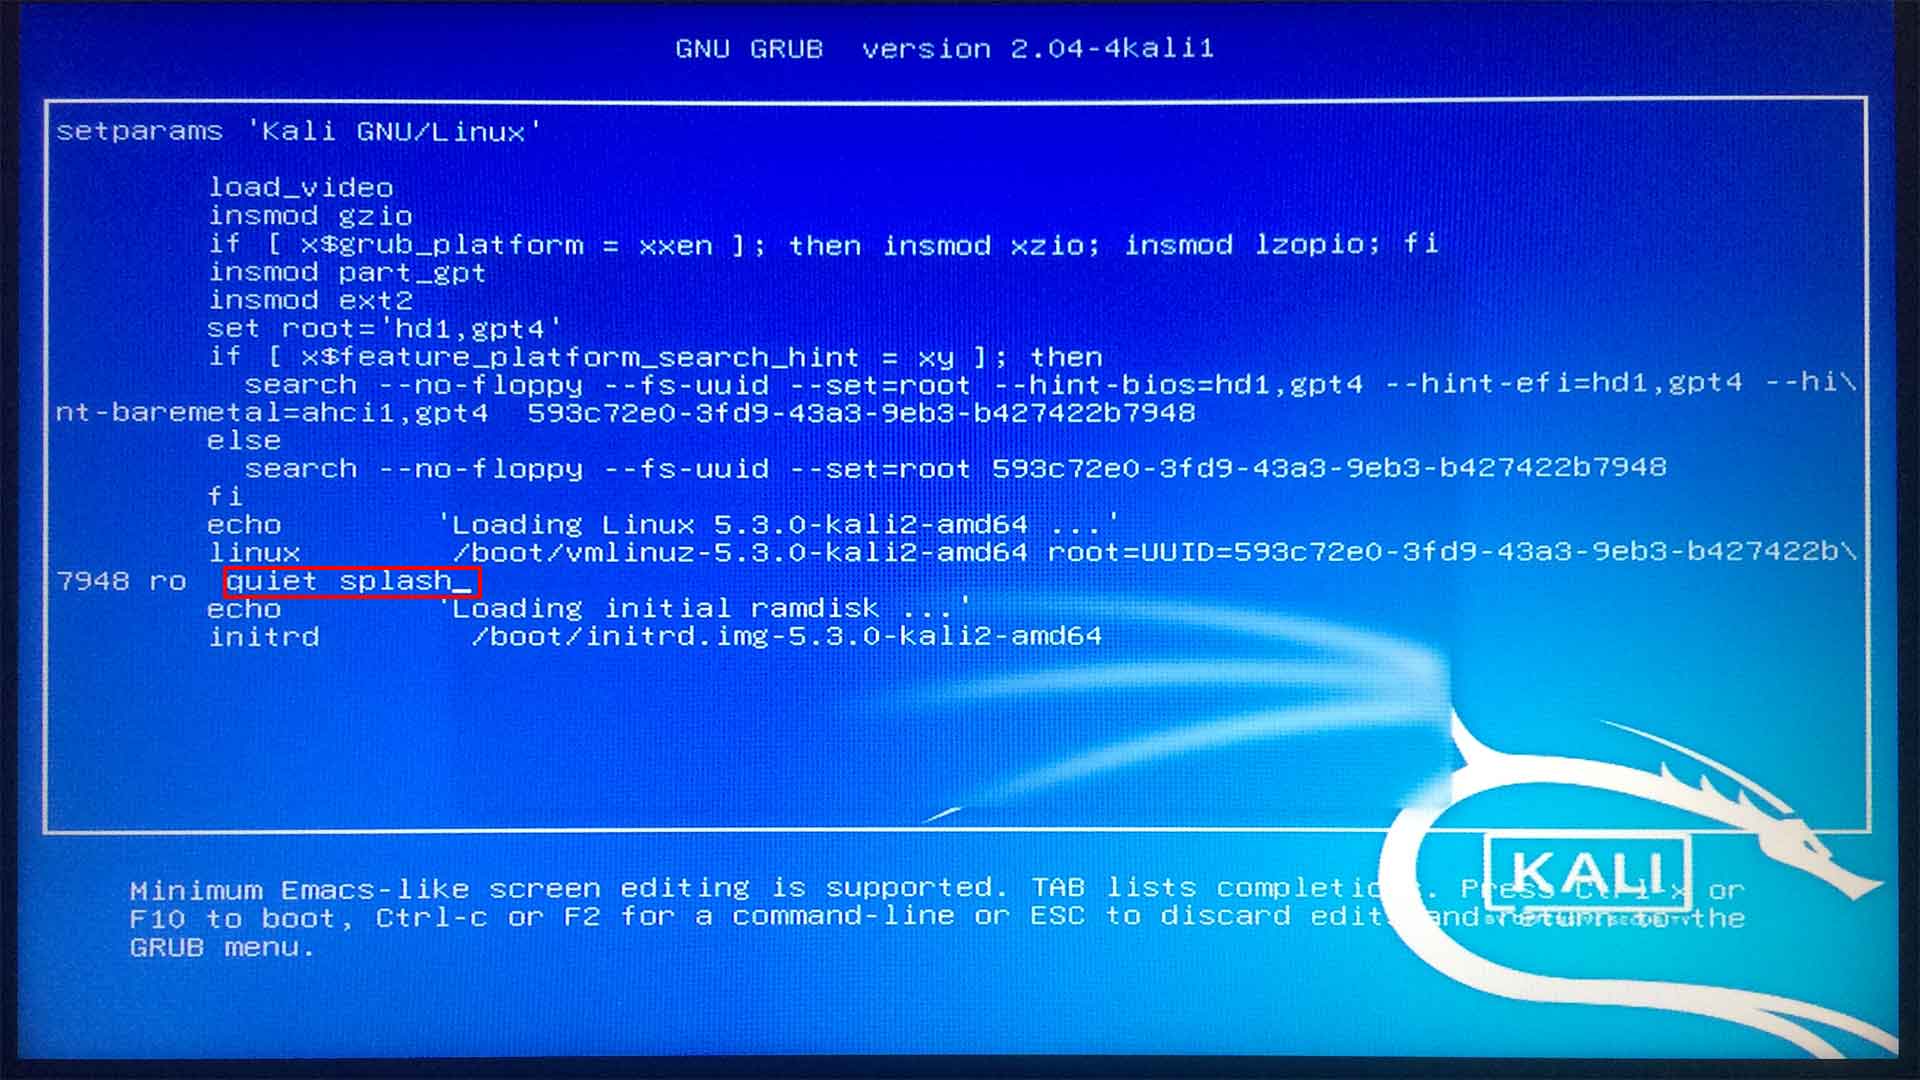
Locate the line that begins with “Linux.” Proceed to the end of this line and replace “quiet splash” with “nouveau.modeset=0,” ensuring the quotation marks are not included.
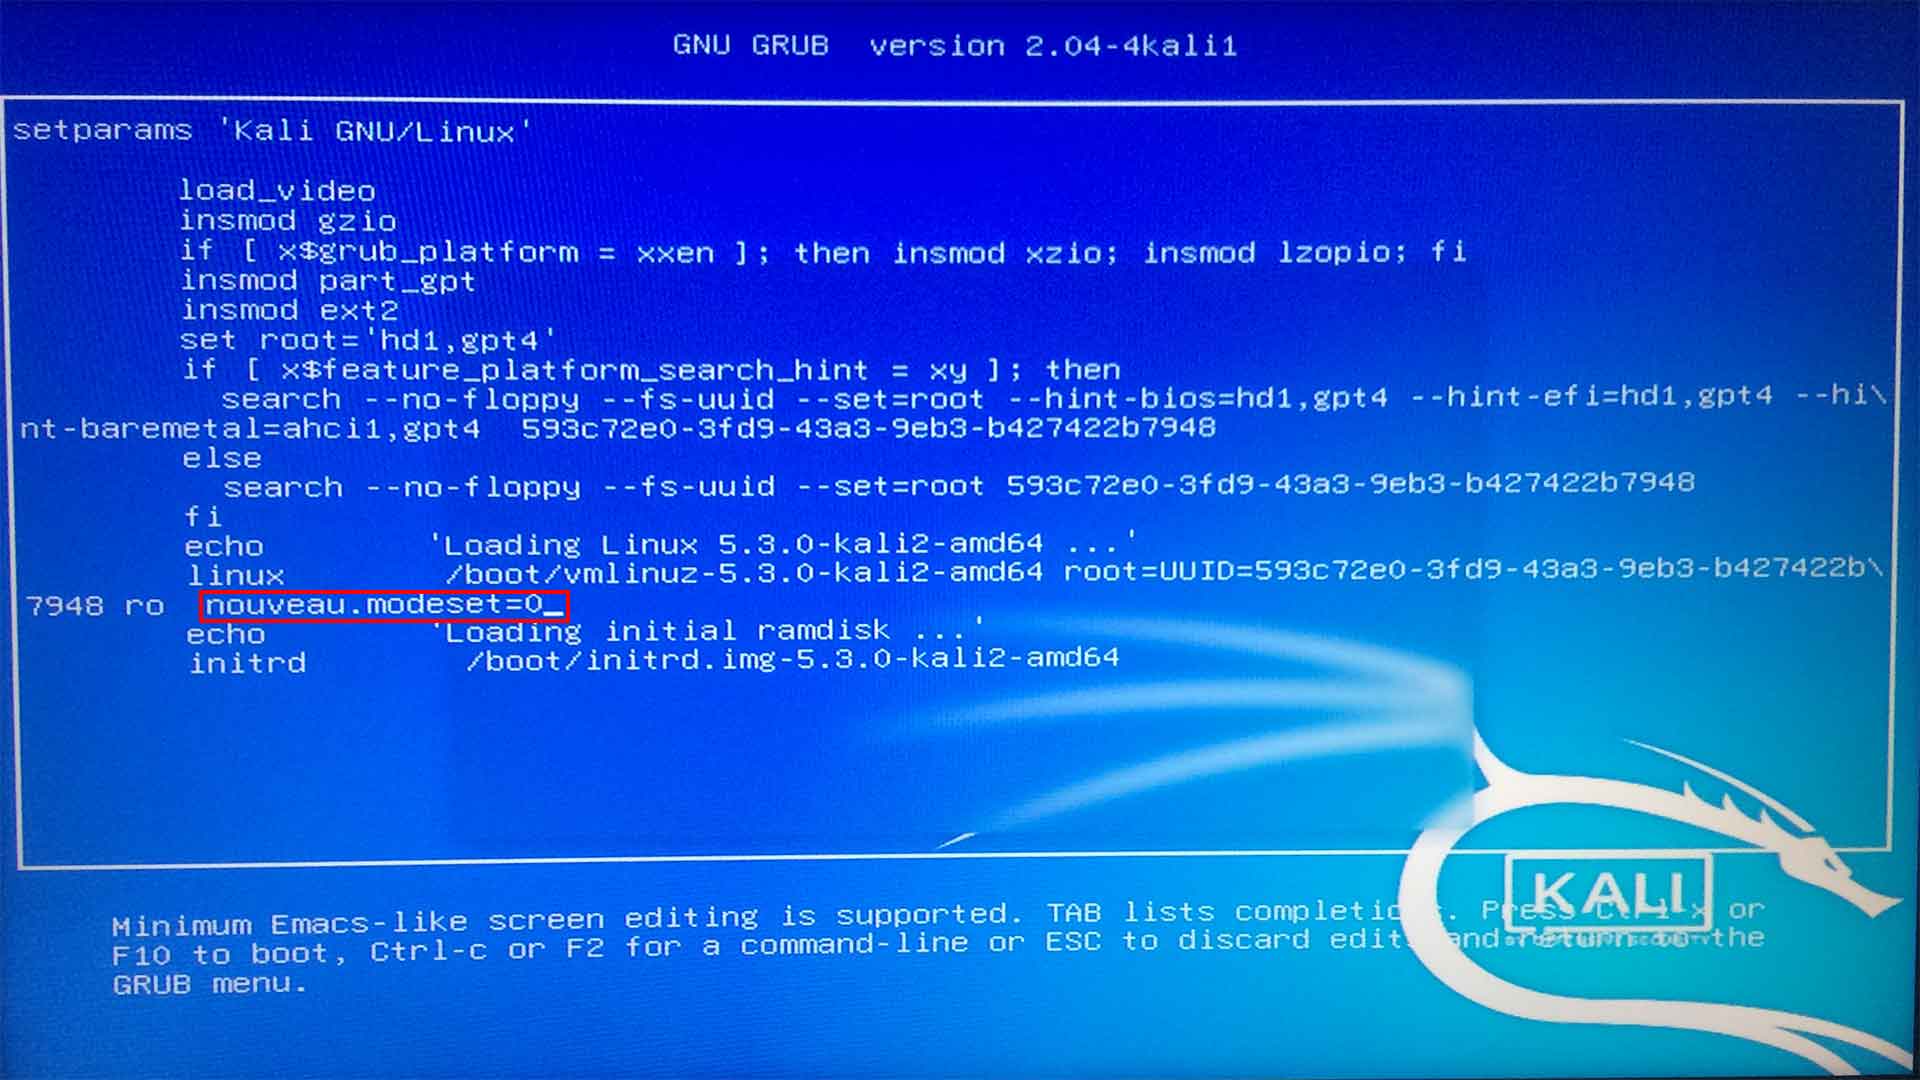
Then press F10.
Step 3: Kernel Headers
Before we begin, you’ll need to make sure you have the kernel headers for your currently active kernel, in order to build the NVIDIA driver kernel modules type:
apt install linux-headers-$(uname -r)
This will automatically resolve the kernel headers package required for the kernel you are currently using.
Step 4: Disable nouveau
echo -e "blacklist nouveau\noptions nouveau modeset=0\nalias nouveau off" > /etc/modprobe.d/blacklist-nouveau.conf
update-initramfs -u && reboot
Now system will reboot and nouveau should be disabled.
Verify if nouveau is disabled:
lsmod |grep -i nouveau
If this command shows nothing, that means nouveau has successfully disabled.
Step 5: Install NVIDIA GPU driver from Kali repository
Run the following command to install Nvidia driver on Kali Linux.
apt-get install nvidia-driver nvidia-xconfig
Find the bus id of Nvidia card:
nvidia-xconfig --query-gpu-info | grep 'BusID : ' | cut -d ' ' -f6
>>My result: PCI:1:0:0
>>PCI:1:0:0 This is our Bus ID.
Step 6: Configuring the Xorg Server for Nvidia
Now we will create /etc/X11/xorg.conf file with this bus ID according to the Nvidia’s guide.
You can download the xorg.conf file from here and edit the BusID value with your Bus ID using any text editor. Then keep the xorg.conf file in /etc/X11/
Or you can make a xorg.conf file using the text below.
Section "ServerLayout"
    Identifier "layout"
    Screen 0 "nvidia"
    Inactive "intel"
EndSection

Section "Device"
    Identifier "nvidia"
    Driver "nvidia"
    BusID "PCI:1:0:0"
EndSection

Section "Screen"
    Identifier "nvidia"
    Device "nvidia"
    Option "AllowEmptyInitialConfiguration"
EndSection

Section "Device"
    Identifier "intel"
    Driver "modesetting"
EndSection

Section "Screen"
    Identifier "intel"
    Device "intel"
EndSection
>>Replace the BusID value with your Bus ID and save it to /etc/X11/xorg.conf
Step 7: Setting Up Optimus Configuration
Now we have to create some scripts according to our display manager. Since I am using GDM as the display manager for Kali Linux, I have created two optimus.desktop files in the directory specified below with the following content:
[Desktop Entry]
Type=Application
Name=Optimus
Exec=sh -c "xrandr --setprovideroutputsource modesetting NVIDIA-0; xrandr --auto"
NoDisplay=true
X-GNOME-Autostart-Phase=DisplayServer
Directory 1: /usr/share/gdm/greeter/autostart/optimus.desktop
Directory 2: /etc/xdg/autostart/optimus.desktop
You can also download the optimus.desktop file for GDM and copy that to both directory /usr/share/gdm/greeter/autostart/ and /etc/xdg/autostart/
Step 8: Finalizing NVIDIA Driver Installation
Now reboot your computer and you should be using Nvidia Driver. Verify if everything is working perfectly by using the command below:
apt-get install mesa-utils
glxinfo | grep -i "direct rendering"
Result Should be “direct rendering: Yes”
If the Nvidia driver is installed successfully, then your graphics card name will be displayed in the Kali Linux’s about section.

Installing Nvidia CUDA Toolkit:
apt-get install ocl-icd-libopencl1 nvidia-cuda-toolkit
Hashcat-nvidia package:
apt install -y ocl-icd-libopencl1 nvidia-driver hashcat-nvidia
Verify Driver Installation:
nvidia-smi
Querying GPU Information:
nvidia-smi -i 0 -q
Installing Hashcat and verifying CUDA is working with hashcat:
sudo apt install -y hashcat
hashcat -I
Hashcat GPU benchmarking:
hashcat -b | uniq
Follow these steps if you made mistakes and stuck in the boot screen, and now you want to uninstall Nvidia driver and revert all of the work you’ve done so far:
Press CTRL+ALT+F2 or CTRL+ALT+F3, login with your password.
apt-get remove --purge nvidia-*
rm -rf /etc/X11/xorg.conf
rm -rf /usr/share/gdm/greeter/autostart/optimus.desktop
rm -rf /etc/xdg/autostart/optimus.desktop
This comprehensive guide is designed to navigate you through the complex process of installing NVIDIA drivers on Kali Linux. By following these steps carefully, you can ensure a successful installation and optimal performance of your NVIDIA graphics card on Kali Linux.


Subscribe To Our Newsletter
Join our mailing list to receive the latest news and updates from our team.
You have Successfully Subscribed!